CIS 1051 - Temple Rome Spring 2023
![]()
![]()
Overview of pygame & SDP
Prof. Andrea Gallegati
... an overview of pygame
How to use pygame to make games with graphics, animations, user input, sound.
This class will make use of some terms and concepts that have not been yet defined/introduced.
Take them as abstract entities, as long as they wont't be covered in details!
The following slides are taken from an amazing book! https://nostarch.com/inventwithpython
Install pygame
you can use any packet manager, e.g.
>>> pip install pygame
and check it, entering in the interactive shell:
>>> import pygame
... if no ImportError appears, it installed correctly.
pygame I/O
pygame module does not work very well in interactive mode.
Use an Integrated Development Environment (aka IDE), such as Visual Studio Code or its Dockerized version.
pygame programs don’t use the print() or input() functions, instead
- displays output by drawing graphics/text in separate window
- input comes from the keyboard and the mouse events
import pygame
First, import the pygame module to call its functions along with several other modules
import pygame, sys
from pygame.locals import *
as comma separated modules within the same line.
The pygame.locals module import brings many constant variables to use with pygame, such as
QUIT, which helps you quit the programK_ESCAPE, which represents theESCkey.
the following syntax
from <a_module_name> import *
rather than
import <a_module_name>
let use <a_module_name> without typing the name in front of its methods, constants, or anything else from within it.
Sometimes, better to use the full function name to know which module the function is in, e.g. sys.exit()
initialize pygame
Always call pygame.init()
- after importing the module
- before calling any other
pygamefunction.
pygame.init()
... and it is ready to use.
Don’t need to know what init() does; just remember to call it before using any other pygame functions.
setup the GUI
To prepare a graphical user interface (aka GUI) window calls the set_mode() method in the pygame.display module.
windowSize = (500, 400)
windowSurface = pygame.display.set_mode(windowSize)
(The display module is a module inside the pygame module. Even the pygame module has its own modules!)
This helps set up a window for pygame to run in. This window uses a coordinate system, that is organized in pixels.
A pixel is the tiniest dot on your computer screen and it can light up in any color.
All the pixels on your screen work together to display the pictures you see. We’ll create a window 500 pixels wide and 400 pixels tall by using a tuple.
There are several parameters to pass to the pygame.display.set_mode() method: the mandatory one is a tuple of two integers for the width and height of the window, in pixels.
Then we can set a title, with this function that change the name on the window:
The set_caption() method just sets the window’s caption, that is in the top left of the window.
pygame.display.set_caption('Hello world!')
The set_mode() function in the pygame.display module returns a pygame.Surface object (we’ll call Surface objects for short).
The Surface object represents the window.
For now, an object is just another name for a value of a data type that has methods, for example: strings have data (the string itself) and methods (e.g.lower() and split()). Variables store references to objects just as they store references for other types.
Inside the pygame module there are, for example, the font and surface modules.
Inside those modules are the Font and Surface data types.
- modules names begin with a lowercase letter
- data types begin with an uppercase letter
This is a good example of why naming conventions can turn usefull sharing code with others.
setup color variables
There are three primary colors of light for pixels: red, green, and blue. By combining different amounts of these three colors you can form any other color.
In pygame, colors are represented by tuples of three integers (aka RGB color codes).
Not to rewrite a tuple every time we need it, let's make constants to hold that values (colors).
BLACK = (  0,   0,   0)
WHITE = (255, 255, 255)
RED   = (255,   0,   0)
GREEN = (  0, 255,   0)
BLUE  = (  0,   0, 255)
You can mix the amount of red, green, and blue to get any shade of any color!
the Surface Object
We want to fill the entire surface stored in windowSurface with the color black, as we did within our snake game.
The fill() function will completely cover the surface with the color you pass as the parameter.
windowSurface.fill(BLACK)
Note, the window won’t change when you call the fill() method or any other drawing function: these just change the Surface object.
pygame.display.update() function will render it to the screen.
Modifying the Surface object in the computer’s memory is much faster than modifying the image on the screen.
Better (more efficient) to render it once all the other methods were called on the Surface object.
pygame's drawing functions
Similarly to the turtle module, even pygame has its own functions to draw shapes and lines.
Here, each shape has its own function, and you can combine these shapes into different pictures for your graphical game.
Draws any polygon shape (a multisided shape with straight lines sides). To draw circles and ellipses, for example, there are other functions.
pygame.draw.polygon(windowSurface, GREEN,
                    ((146, 0), (291, 106),
                    (236, 277), (56, 277), (0, 106)))
- The Surface object to draw the polygon on.
- The color of the polygon.
- A tuple of tuples for the coordinates of the points to draw in order. Last point, automatically connects to the first.
- The width of the polygon lines (optional, without it the polygon is filled in).
Draws couple lines from one point on the screen to another point.
pygame.draw.line(windowSurface, BLUE,
                 (60, 60), (120, 60), 4)
pygame.draw.line(windowSurface, BLUE,
                 (120, 60), (60, 120))
- The Surface object to draw the line on.
- The color of the line.
- Two tuples for the line end-points coordinates.
- The width ofthe line in pixels (optional).
Draws a circle.
pygame.draw.circle(windowSurface, BLUE,
                   (300, 50), 20, 0)
- The Surface object to draw the circle on.
- The color of the circle.
- A tuple for the coordinates of the circle's center.
- The radius (i.e. size) of the circle.
- The line width in pixels (optional, if
0the circle is filled in).
Draws an ellipse, which is like a squished circle. Thus, the two functions are similar.
 pygame.draw.ellipse(windowSurface, RED,
                     (300, 250, 40, 80), 1)
- The Surface object to draw the ellipse on.
- The color of the ellipse.
- A tuple for the coordinates of the circle's center.
- A tuple of four integers for the top-left corner coordinates, the width and height of the
Rectobject containing the ellipse. - The ellipse width in pixels (optional, if
0the ellipse is filled in).
Draws a rectangle.
pygame.draw.rect(windowSurface, RED,
     (textRect.left - 20,  textRect.top - 20,
      textRect.width + 40, textRect.height + 40))
- The Surface object to draw the rectangle on.
- The color of the rectangle.
- A tuple for the coordinates of the circle's center.
- A tuple of four integers for the top-left corner coordinates, the width and height of the rectangle.
Instead of that tuple, a `Rect` object can be passed as well.
The pygame.Rect data type (Rect for short) represents rectangular areas of a certain size and location, to put text in, for example.
This is what we use to set the location of objects on a window.
basicFont = pygame.font.SysFont(None, 48)
text = basicFont.render('Hello world!', True,
                         WHITE, BLUE)

textRect = text.get_rect()
... once created a Font object, a Rect object is already made for it: just retrieve it using the get_rect() method on text and then assign it.
To create (from scratch) a new Rect object:
pygame.Rect(left, top, width, height)
Notice that it has the same name as the data type. These are called constructor functions (create objects or values of their data type).
The parameters are the coordinates of the top-left corner, followed by the width and height, all in pixels.
Just as methods are functions that are associated with an object, attributes are variables that are associated with an object.
The Rect data type has many attributes that describe the rectangle they represent.
To set its location on the window, we could assign its center coordinates, i.e. centerx and centery, the attributes that store these coordinates.
textRect.centerx = windowSurface.get_rect().centerx
textRect.centery = windowSurface.get_rect().centery
To put textRect in the center of the window, just get the windowSurface Rect object's centerx and centery attributes, and then assign those to the textRect's ones!
There are many other Rect attributes that we can use.
A great thing about Rect objects is that if you modify any of these attributes, all the other attributes will automatically modify themselves, accordingly.
the blit() method for Surface Objects
it draws the contents of one Surface object onto another Surface object.
Text objects created by the render() method exist on their own Surface object.
Pygame drawing methods can all specify the Surface object to draw on, but text was stored into a variable rather than drawn onto windowSurface.
To draw text on the Surface we want it to appear on, let's use the blit() method:
windowSurface.blit(text, textRect)
The second parameter to blit() specifies where on windowSurface the text surface should be drawn.
The Rect object we get from calling text.get_rect() is then passed for this parameter.
drawing Surface Objects on the screen
In pygame nothing is actually drawn to the screen until the update() function is called, to display our updated Surface object:
pygame.display.update()
To save memory, don’t update after every single drawing function; instead, update the screen just once, after all the drawing functions have been called.
Events and the Game Loop
Usually, pygame programs are constantly running through a game loop, executing every line of code in a loop, about 100 times a second.
The game loop constantly checks for new events, updates the state of the window, and draws the window on the screen.
Events are generated by pygame whenever the user presses a key, clicks or moves the mouse, or performs some other action recognized by the program that should make something happen in the game.
An Event is an object of the pygame.event.Event data type.
The condition for the while statement is set to True so that it loops forever.
while True:
The only time the loop will exit is if an event causes the program to terminate.
... getting Event Objects
The function pygame.event.get() checks for any new pygame.event.Event object (called Event object for short), generated since the last call to pygame.event.get().
These are returned as a list of Event objects, which the program will then parse to perform some action in response to the event itself.
All Event objects have an attribute called type. Right now, we only need to use the QUIT event type, which tells us when the user quits the program.
exiting the program
The for loop is to iterate over each Event object in the list returned by pygame.event.get().
for event in pygame.event.get():
    if event.type == QUIT:
        pygame.quit()
        sys.exit()
If the type attribute is the constant variable QUIT, defined within the pygame.locals module imported at the beginning, the program is then told what to do (e.g. when the user closes the program’s window).
The pygame.quit() function is sort of the opposite of init(). You need to call it before exiting your program.
If you forget, you may cause IDLE to hang after your program has ended.
Moving and Bouncing the Boxes
Here we have three boxes moving around and bouncing off the walls of a window. First, let's consider how we want the boxes to move:
Each box will move in one of four diagonal directions. When a box hits the side of the window, it should bounce off and move in a new diagonal direction.
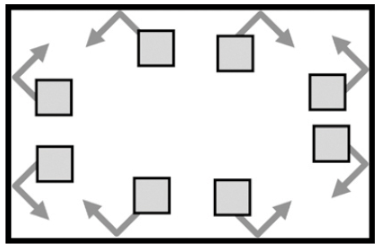
The new direction that a box moves after it bounces depends on two things:
- which direction it was moving before the bounce.
- which wall it bounced off.
There are eight possible ways a box can bounce: two different ways for each of the four walls.
We can use a Rect object to represent the position and size of the box, a tuple of three integers (RGB) to represent the color of the box, and an integer to represent which of the four diagonal directions the box is currently moving in.
The game loop will adjust the position of the box and draw all the boxes on the screen at each iteration.
As the program execution iterates over the loop, the boxes will gradually move across the screen so that it looks like they’re smoothly moving and bouncing around.
setup the Constant Variables
import pygame, sys, time
from pygame.locals import *

pygame.init()

WWIDTH  = 400 ; WHEIGHT = 400
windowSurface = pygame.display.set_mode((WWIDTH,
                                       WHEIGHT))
pygame.display.set_caption('Animation')
In this program, the window’s size is used for more than just the set_mode() call.
If you ever want to change this size, just change these constant variables.
We’ll use constant variables for the four directions the boxes can move in:
DOWNLEFT  = 'downleft'
DOWNRIGHT = 'downright'
UPLEFT    = 'upleft'
UPRIGHT   = 'upright'
We also create a constant variable to determine how fast the boxes should move:
MOVESPEED = 4
... tells the program how many pixels each box should move, on each iteration, through the game loop.
Constant variables are used for readability.
setup the Box Data Structures
Next we’ll define the boxes.
To keep things simple, a dictionary as a data structure is used to represent each moving box.
The dictionary will have the keys:
rectwith a Rect object for a valuecolorwith a tuple of three integers for a valuedirwith one of the direction constant variables for a value.
The animation code can be used to animate as many boxes as defined within the data structure.
The variable b1 stores one of these box data structures:
b1 = {'rect':pygame.Rect(300, 80, 50, 100),
      'color':RED, 'dir':UPRIGHT}
This box’s top-left corner is located at (300, 80). It has a width of 50 pixels and a height of 100 pixels.
Its color is RED, and its initial direction is UPRIGHT.
b2 = {'rect':pygame.Rect(200, 200, 20, 20),
      'color':GREEN, 'dir':UPLEFT}
b3 = {'rect':pygame.Rect(100, 150, 60, 60),
      'color':BLUE, 'dir':DOWNLEFT}
boxes = [b1, b2, b3]
... two more similar data structures for the other boxes, with different sizes, positions, colors, directions and a list to collect them all!
If you needed to retrieve a box or value from the list, you could do so using indexes and keys.
Entering boxes[0] would access the dictionary data structure in b1.
Entering boxes[0]['color'] would access the color key in b1.
Now the game loop handles animating the moving boxes.
Animations work by drawing a series of pictures with slight differences that are shown one right after another.
- Each box will move by 4 pixels in each picture. The pictures are shown so fast that the boxes will look like they are moving smoothly across the screen.
- If a box hits the side of the window, then the game loop will make the box bounce by changing its direction.
Now that we know a little bit about how the game loop will work, let’s code it!
On each iteration through the game loop, the code redraws the entire window with new boxes, located a few pixels over, each time.
To make sure that windowSurface is ready to be drawn on (not to end up with a trail of Rect objects instead of a smooth animation) let's clear the window, every iteration of the game loop.
... fills the entire Surface with WHITE to erase anything else:
windowSurface.fill(WHITE)
Once windowSurface is filled, we can start drawing all of our Rect objects.
windowSurface.fill(WHITE)
moving each Box
To move each box, we need to iterate over the boxes list:
for b in boxes:
  if b['dir'] == DOWNLEFT:
    b['rect'].left -= MOVESPEED
    b['rect'].top += MOVESPEED
  if b['dir'] == DOWNRIGHT:
    b['rect'].left += MOVESPEED
    b['rect'].top += MOVESPEED
  if b['dir'] == UPLEFT:
    b['rect'].left -= MOVESPEED
    b['rect'].top -= MOVESPEED
  if b['dir'] == UPRIGHT:
    b['rect'].left += MOVESPEED
    b['rect'].top -= MOVESPEED
and change each box position depending on the direction it is moving.
The if statements are to figure out the box’s direction by checking the dir key inside the box data structure.
New values for each box's attributes depends on the box’s direction.
The value of these attributes will increase or decrease by the amount of the integer stored in MOVESPEED.
bouncing the Box
Once the boxes have been moved, we need to check whether the box has gone past the edge of the window.
If it has, you want to bounce the box, i.e. set a new value for the box’s dir key to move the box on the next iteration of the game loop.
In that case, the direction will be changed based on which direction the box was moving.
if b['rect'].top < 0:
  # The box has moved past the top.
  if b['dir'] == UPLEFT:
    b['dir'] = DOWNLEFT
  if b['dir'] == UPRIGHT:
    b['dir'] = DOWNRIGHT
here we determine if the box has moved past the top edge of the window.
the code her below, instead, handle the situation in which the box has moved past the bottom edge of the window.
if b['rect'].bottom > WINDOWHEIGHT:
  # The box has moved past the bottom.
  if b['dir'] == DOWNLEFT:
    b['dir'] = UPLEFT
  if b['dir'] == DOWNRIGHT:
    b['dir'] = UPRIGHT
Remember that the y-coordinates start at 0 at the top of the window and increase to WINDOWHEIGHT at the bottom.
This handles the behavior of the boxes when they bounce off the left side:
if b['rect'].left < 0:
  # The box has moved past the left side.
  if b['dir'] == DOWNLEFT:
    b['dir'] = DOWNRIGHT
  if b['dir'] == UPLEFT:
    b['dir'] = UPRIGHT
This handles the behavior of the boxes when they bounce off the right side:
if b['rect'].right > WINDOWWIDTH:
  # The box has moved past the right side.
  if b['dir'] == DOWNRIGHT:
    b['dir'] = DOWNLEFT
  if b['dir'] == UPRIGHT:
    b['dir'] = UPLEFT
Remember that the x-coordinates start at 0 on the window’s left edge and increase to WINDOWWIDTH on the right one.
Every time the boxes move, let's draw them in their new positions on windowSurface by calling:
pygame.draw.rect(windowSurface, b['color'], b['rect'])
passing the windowSurface, being the Surface object to draw the rectangle on, as well as the color and the Rect object with the new position and size of the rectangle to draw.
After the for loop, each box in the boxes list will be drawn on the screen:
pygame.display.update()
time.sleep(0.02)
If the program ran at full speed, all the boxes would look like a blur. To make the program run slowly enough that we can see the boxes, let's add a time.sleep(0.02) to pause the program for 20 milliseconds, between each movement of the boxes.
After that, the execution returns to the start of the game loop and begins the process all over again.
This way, the boxes are constantly moving a little, bouncing off the walls, and being drawn on the screen in their new positions.
Drafting a Software Development Plan (SDP)
Since we are putting on the table so many ingredients, let's start thinking about a recipe to develop our own videogame, using Python3 and pygame module, more in particular.
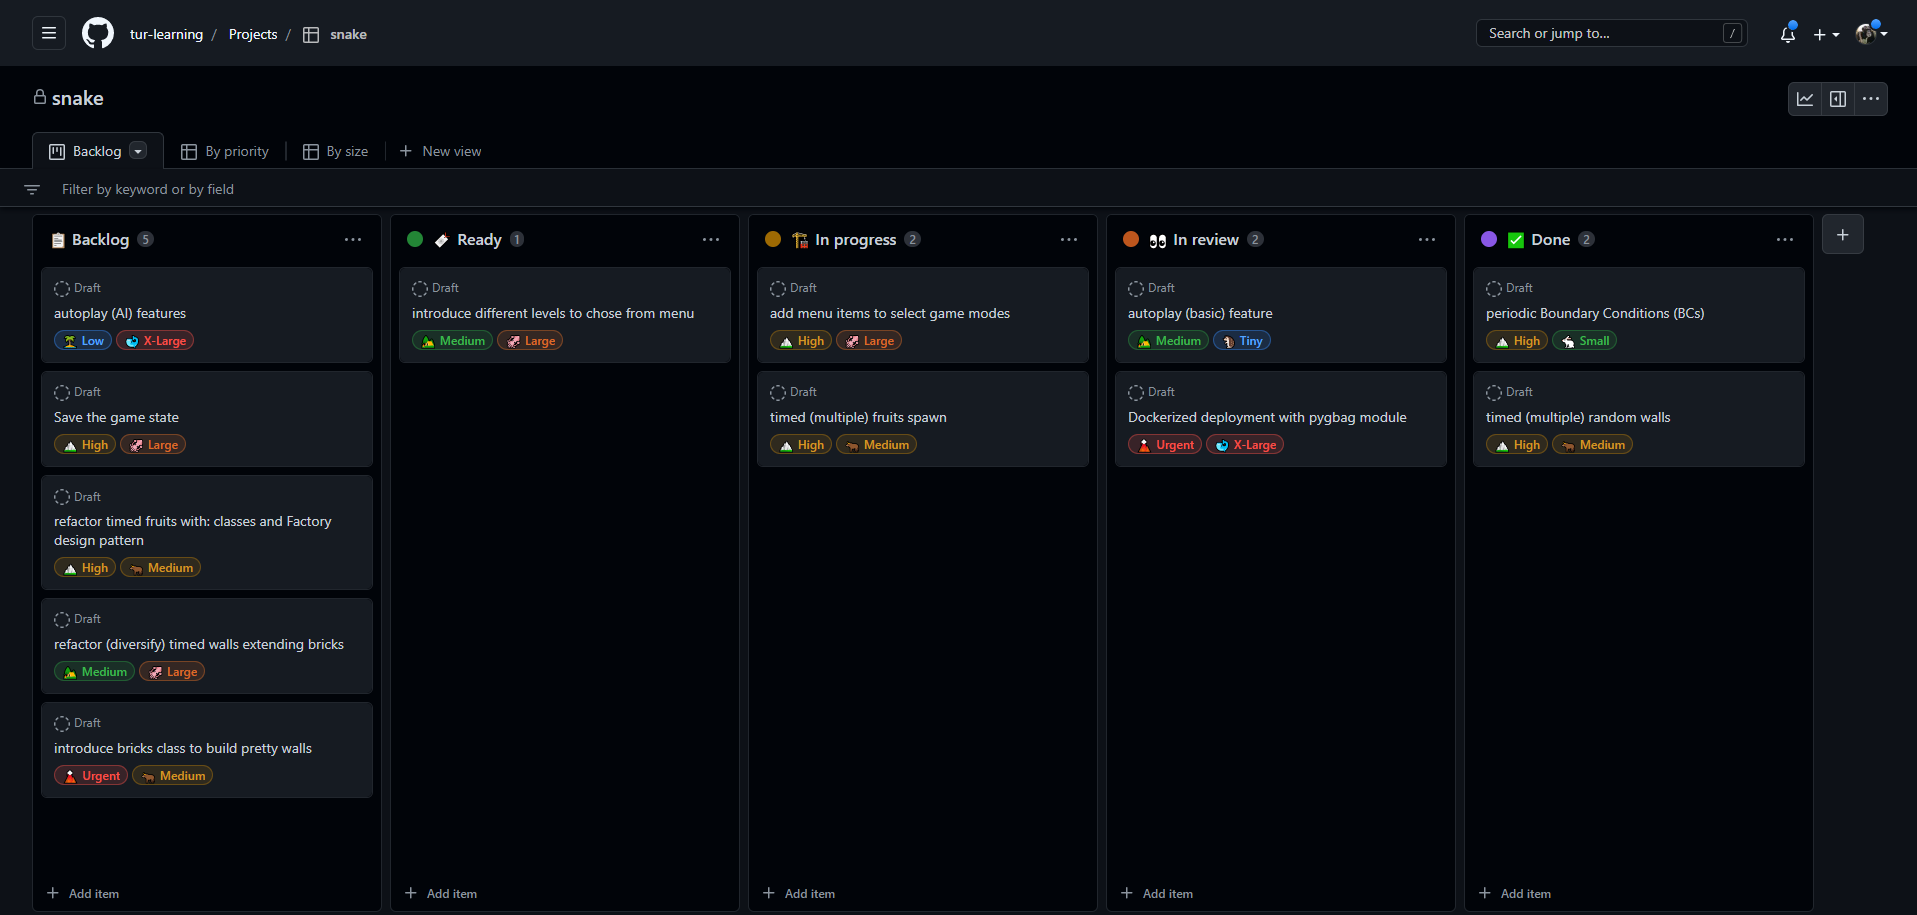
Let's walk through the skeleton of the SDP for a videogame (snake) we have, so far, already worked a lot on!
Introduction:
- Brief description of the Snake game and its functioning.
- Explanation of why this game was selected for the project.
- Overview of the development process, the tools and technologies that will be used.
Requirements:
- Detailed description of the game's functionalities and features.
- Explanation of the game's user interface (GUI) and controls (commands).
- List of the hardware/software requirements for the game.
Design:
- High-level diagram (aka flowcharts) of the game's architecture.
- Detailed description of the game's components, including the game loop, sprite classes, and input handling.
- Explanation of the data structures that will be used to represent the game state, such as the snake's position/direction and the food ones.
- Discussion of the algorithms that will be used depending on the game logic, e.g. collision detection.
Implementation:
- Plan for the development of each component of the game.
- Explanation of how the different components will interact with each other.
- Discussion of the coding conventions and standards that will be followed.
- List of the testing procedures that will be used to validate the game (aka unit tests).
Deployment:
- Explanation of the steps required to deploy the game, including creating an executable, packaging the game, and installing it on the target system.
- Discussion of the issues that may arise during deployment, such as compatibility with different operating systems.
- Explanation of the steps that will be taken to resolve any deployment issues, e.g. running the game on a Docker container, including building a Docker image, using 3rd-party software such as
pygbagmodule.
Maintenance:
- Explanation of the procedures that will be used to maintain the game over time, including fixing bugs, updating the game to support new hardware and software, and adding new features.
- Discussion of the steps that will be taken to ensure that the game continues to run smoothly and that any issues are resolved in a timely manner, e.g. setting up a GitLab pipeline and/or GitHub actions, to repackage the whole game each pull request (aka PR) and automating unit-tests.
Conclusion:
- Summary of the main points covered in the SDP.
- Discussion of the benefits of having a well-defined SDP for the development of this game.
- Final thoughts and recommendations for future work.
The goal is to provide a **clear and comprehensive plan** for the development of the game, to help ensure that the project is completed on time and within budget.
Organize your work (divide it into atomic tasks) might help.
... Kanban boards (e.g. on GitHub) and Gantt charts help even more !
... more on pygame playground: Collision Detection
Figuring out when two things on the screen have touched (aka collided with) each other, is really useful for games.
- If the player touches an enemy, they may lose health.
- If the player touches a coin, they should automatically pick it up.
- If the game character is standing on solid ground or there’s nothing but empty air beneath them.
Collision detection will determine whether two rectangles are overlapping each other.
Moreover, pygame programs can accept input from the player through the keyboard and the mouse. It’s a bit more complicated than calling the input() function.
- using the keyboard is much more interactive in GUI programs
- using the mouse isn’t even possible in CLI ones!
This will make our games more exciting!
In the upcoming example a black box “eats” smaller green squares (food), randomly appearing on the screen, as it touches them. The player can:
- press the
arrowkeys to move the black box - click anywhere in the window to create new food squares
- press
ESCkey to quit the program - press the
Xkey to teleport the player to a random place
import modules and initializing pygame
After importing the usual modules (plus the random module):
import pygame, sys, random
from pygame.locals import *
... and after initializing pygame, setting WINDOWHEIGHT and WINDOWWIDTH and assigning colors and direction constants, we will make use of a clock to pace the program:
mainClock = pygame.time.Clock()
As we did in the previous example, calling
time.sleep(0.02)
to slow down the program, will always pause for 0.02 seconds on all computers, but then the speed of all the rest of the program depends on how fast the computer is.
If we want this program to run at the same speed on any computer, we need a function that pauses longer on fast computers and shorter on slow computers.
A pygame.time.Clock object can pause an appropriate amount of time on any computer, calling tick() method inside the game loop
mainClock.tick(40)
This waits enough time so that it runs at about 40 iterations a second, no matter what the computer’s speed is. This ensures that the game never runs faster than you expect. This call should appear only once in the game loop.
Window and Data Structs
Setup a few variables for the food squares that appear on the screen:
foodCounter = 0
NEWFOOD = 40
FOODSIZE = 20
... we will see how these are used later when we create the food.
Setup a pygame.Rect object for the player’s location:
player = pygame.Rect(300, 100, 50, 50)
calling the constructor, wiht the box’s size and position.
In this program, the player can control where the box moves.
To keep track of the food squares (randomly placed) the program uses foods, a list of Rect objects:
foods = []
for i in range(20):
    foods.append(pygame.Rect(random.randint(0, WINDOWWIDTH - FOODSIZE),
    random.randint(0, WINDOWHEIGHT - FOODSIZE), FOODSIZE, FOODSIZE))
and the random.randint() function provides for random x/y coordinates.
Again, the program calls the pygame.Rect() constructor function to return a new food object.
You want the random coordinate to be between 0 and the size of the window minus the size of the food square, not to have the food square to be pushed outside of the window altogether.
Variables to Track Movement
Player’s box can move in four directions (initially set to False):
moveLeft = False
moveRight = False
moveUp = False
moveDown = False
Boolean values to keep track of which arrow key is being pressed.
MOVESPEED = 6
and the speed at which the player moves has to be defined as well.
Handling Events
The pygame module can generate events in response to user input from the mouse or keyboard.
The following are the events that can be returned by pygame.event.get():
QUITwhen the player closes the window.KEYDOWNwhen the player presses a key.- It has a
keyattribute to tell which key was pressed and amodattribute (whether SHIFT, CTRL, ALT or others are held down together).
- It has a
KEYUPwhen the player releases a key.- It hs
keyandmodattributes, similar to those forKEYDOWN.
- It hs
MOUSEMOTIONwhenever the mouse moves over the window.posattribute that returns a tuple(x, y)with the coordinates of the cursor.relattribute returns an(x, y)tuple of relative coordinates since the last MOUSEMOTION event.buttonattribute returns a tuple ofint(0/1) for – left, middle (if any) and right – mouse buttons if not being/being pressed while moved.
MOUSEBUTTONDOWNwhen a mouse button is pressed.posattribute, a(x, y)tuple for the cursor position coordinates, when the button is pressed.
MOUSEBUTTONUPwhen the mouse button is released.- same attributes as MOUSEBUTTONDOWN.
As usual the game loop starts to handle events, e.g. the player quits
 while True:
     for event in pygame.event.get():
         if event.type == QUIT:
             pygame.quit()
             sys.exit()
if event.type == KEYDOWN:
... as well as keypress and key release events!
handling the KEYDOWN event
If the event type is KEYDOWN, then the Event object has a key attribute that indicates which key was pressed.
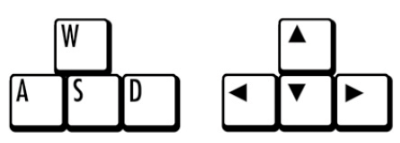
When the player presses an arrow key or a WASD key (aka wazz-dee), we want the box to move.
We will use if statements to check the pressed key in order to tell which direction the box should move.
These lines compare the key attribute to the pygame.locals constants
if event.key == K_LEFT or event.key == K_a:
    moveRight = False ; moveLeft = True
if event.key == K_RIGHT or event.key == K_d:
    moveLeft = False ; moveRight = True
if event.key == K_UP or event.key == K_w:
    moveDown = False ; moveUp = True
if event.key == K_DOWN or event.key == K_s:
    moveUp = False ; moveDown = True
The W, A, S, and D keys are used as alternates for changing the movement variables, letting the player use their left hand instead of their right, improving usability.
handling the KEYUP event
When the player releases the key they were pressing
if event.type == KEYUP
a KEYUP event is generated instead.
If the released key was ESC, then Python should terminate the program.
         if event.key == K_ESCAPE:
            pygame.quit()
            sys.exit()
remember to call the pygame.quit() function before sys.exit().
... and set a movement variable to False when a direction’s key is released:
        if event.key == K_LEFT or event.key == K_a:
            moveLeft = False
        if event.key == K_RIGHT or event.key == K_d:
            moveRight = False
        if event.key == K_UP or event.key == K_w:
            moveUp = False
        if event.key == K_DOWN or event.key == K_s:
            moveDown = False
This will make the box stop moving, as we will see.
Teleporting the Player
You can also add teleportation to the game!
if event.key == K_x:
    player.top = random.randint(0, WINDOWHEIGHT -
                                    player.height)
    player.left = random.randint(0, WINDOWWIDTH -
                                    player.width)
If the player presses the X key, set the position of the player’s box to a random place on the window, but not outside of it.
Adding New Food Squares
There are couple ways the player can add new food squares to the screen:
- click a spot in the window where to make the new food square appear
- wait until the game loop has iterated
NEWFOODnumber of times, to randomly generate it
mouse input is handled by events just like keyboard input!
When the player releases the button, a MOUSEBUTTONUP event occurs:
if event.type == MOUSEBUTTONUP:
    foods.append(pygame.Rect(event.pos[0], event.pos[1],
                                    FOODSIZE, FOODSIZE))
- x/y coordinates stored in
event.pos - new food
Rectobject added (aka appended) to the foods list.
foodCounter += 1
if foodCounter >= NEWFOOD:
    foodCounter = 0
    foods.append(pygame.Rect(
                 random.randint(0, WINDOWWIDTH -
                                   FOODSIZE),
                 random.randint(0, WINDOWHEIGHT -
                                   FOODSIZE),
                 FOODSIZE, FOODSIZE))
Each game loop iteration, foodCounter is incremented. Once equal to constant NEWFOOD a new food square is generated.
To change the rate, adjusts NEWFOOD.
Moving the Player Around the Window
Once the movement variables are set (to True or False), depending on the keys, we need to move the player’s box by adjusting the player x/y coordinates.
if moveDown and player.bottom < WINDOWHEIGHT:
    player.top += MOVESPEED
if moveUp and player.top > 0:
    player.top -= MOVESPEED
if moveLeft and player.left > 0:
    player.left -= MOVESPEED
if moveRight and player.right < WINDOWWIDTH:
    player.right += MOVESPEED
Drawing the Player on the Window
pygame.draw.rect(windowSurface, BLACK, player)
After the box is moved, draws it in its new position passing the windowSurface parameter to tell Python which Surface object to draw the rectangle on and the player parameter to tell Python the position and size of the Rect object to draw.
Checking for Collisions
Before drawing the food squares, check if the player’s box has overlapped with any of the food squares, using collision detection method that every Rect object has.
for food in foods[:]:
    if player.colliderect(food):
        foods.remove(food)
In that case, the square needs to be removed from the foods list and Python won’t draw any food squares that the box has already eaten.
On each iteration through the for loop, the current food square from the foods (plural) list is placed in the variable food (singular).
The collision detection method is passed the food object as an argument and returns True if the two rectangles collide.
... this for loop is slightly different: it iterates over foods[:] not food.
Basically foods[:] is a shorter way (thanks to slices) to create a new list with a copy of all the items in foods.
This because you can’t add/remove list items while iterating over it.
DON’T CHANGE A LIST WHILE ITERATING OVER IT
... not to lose track of what the next value is if the list size is changing.
Iterating over a copy (never change), we can modify the original one.
Drawing the Food Squares on the Window
this loops through each food square in the foods list drawing it onto windowSurface.
for i in range(len(foods)):
    pygame.draw.rect(windowSurface, GREEN, foods[i])
Now that everything is on the screen, we are ready to update the window and finish the iteration by calling:
pygame.display.update()
mainClock.tick(40)
The program will continue through the game loop and keep updating until the player quits.
... a bit of sprites: Sounds and Images
Single two-dimensional images used as part of the graphics, are drawn on top of a background.
- flip them horizontally to face the other way
- draw them multiple times and resize to be larger or smaller than the original sprite image
The background image can be considered one large sprite, too.

Sound and Image files
Sprites are stored in image files on your computer. There are several image formats that pygame supports (BMP, PNG, JPG, and GIF).
Look at the end of the filename, right after the last period, this is called the file extension.
You can download images from your web browser or create your own images with a drawing program like Microsoft Paint or Tux Paint.
The sound file formats that pygame supports are MIDI, WAV, and MP3. You can download sound effects from the internet.
In the previous examples, we can use sprites instead of plain-looking squares, e.g. a person to represent the player (the black box) and a sprite of cherries for food (green squares).
We can also play background music and sound effects when the player eats one of the cherries.
Once you download image and sound files to use in our program, place these files in the same folder as the main.py program.
Setup Window and Data Structure
player = pygame.Rect(300, 100, 40, 40)
playerImage = pygame.image.load('player.png')
playerStretchedImage = pygame.transform.scale(playerImage, (40, 40))
foodImage = pygame.image.load('cherry.png')
The player variable stores a Rect object to keep track of the location/size of the player. It doesn’t contain the player’s image.
player = pygame.Rect(300, 100, 40, 40)
playerImage = pygame.image.load('player.png')
playerStretchedImage = pygame.transform.scale(playerImage, (40, 40))
foodImage = pygame.image.load('cherry.png')
Then the load() function is passed a string (filename of the image to load) and the return value is a Surface object having the image file graphics drawn on its surface.
The scale() function (within the in the pygame.transform module) is used to shrink/enlarge a sprite:
- The first argument is a Surface object with the image drawn.
- The second argument is a tuple for the new width/height of the image.
it returns a Surface object with the image drawn at a new size. We will make the player sprite stretch larger as it eats more cherries.
Once called, the constructor function, will create a pygame.mixer.Sound object (Sound object for short)
pickUpSound = pygame.mixer.Sound('pickup.wav')
pygame.mixer.music.load('background.mid')
pygame.mixer.music.play(-1, 0.0)
musicPlaying = True
then it has couple methods
load()to load the background musicplay()to start playing it
- The first parameter is how many times to play the background music after the first time we play it (
-1is to repeat it forever). - The second parameter is the point in the sound file to start playing (in seconds).
The variable musicPlaying is a Boolean to tell the program whether to turn sounds on/off.
This is to give the player the option to run the program without the sound playing, improving usability.
Toggling Sound on/off
The M key can turn the background music on/off.
If musicPlaying is True we could stop it by calling the stop() method or play it again by calling play():
if event.key == K_m:
    if musicPlaying:
        pygame.mixer.music.stop()
    else:
        pygame.mixer.music.play(-1, 0.0)
    musicPlaying = not musicPlaying
Toggling a Boolean value means to set a value to the opposite of its current value.
Drawing the Player on the Window
Since the value stored in playerStretchedImage is a Surface object, we can draw the player's sprite onto the windowSurface object using blit() method:
windowSurface.blit(playerStretchedImage, player)
where second parameter is a Rect object that specifies where in particular the sprite should be drawn.
Checking for Collisions
When the player eats one of the cherries, its size increases by two pixels in height and width.
if player.colliderect(food):
    foods.remove(food)
    player = pygame.Rect(player.left, player.top,
                         player.width + 2,
                         player.height + 2)
    plStrchImg = pygame.transform.scale(playerImage,
                       (player.width, player.height))
    if musicPlaying:
        pickUpSound.play()
- The
Rectobject represents the position/size of the player - The player's image is stored in a
Surfaceobject (plStrchImg) created by callingscale()method. - The
play()method on thepickUpSoundobject, if and only ifmusicPlayingisTrue.
PRO TIP
Stretching an image often distorts it a little and restretching it, the distortions add up quickly.
By stretching always the original image (every time) to a new size, distorts the image only once.
Drawing the Cherries on the Window
Again, for each element in the foods list, let's call the blit() method passing the foodImage Surface object, with the cherries image drawn on it.
for food in foods:
    windowSurface.blit(foodImage, food)
The food variable, containing each of the Rect objects in foods, all along the for loop, tells the blit() method where to draw the foodImage.
What's more?
We have covered some basic Python stuff so far, but still have to introduce so many new concepts!
Think about how they could help you develop your own videogame.
Try using them when writing your SDP (Software Development Plan).
Some (highlighted in bold) have already been discussed throughout this presentation or even just mentioned.
- Lists
- Dictionaries
- Tuples
- Data Structures
- Files (I/O and persistance)
- Classes and Objects
- Classes and Methods
- Inheritance
- Design Patterns
- Performances
- Deploy
- Security